October 30, 2016

Folding Fröbel Stars

Hello everyone,

another Sunday, another video here at Paper, Wool & Yarn :)

Today, I am taking you along while I'm folding a Fröbel Star. Furthermore, you will get an update on my DIY Christmas tree ornaments for this year. Enjoy!


Blog post mentioned at the beginning of the video: Fröbelsterne made in Berlin

In my tea cup: Autumn Herbal Tea by TeeGeschwendner

And this is the final result - 5 big ones and 10 smaller ones :)


Thanks for watching & thanks for stopping by!

Yours
Uta

October 26, 2016

Owls for my Christmas Tree [+ Tutorial]

Hello everyone,

I finally started working on the ornaments for this year's Christmas Tree! Last year I went all Harry Potter and I loved it :) This year, I don't really have a theme. Nevertheless, I want to make a few ornaments myself. And these are the first DIY ornaments - owls!


It all started over at Pinterest where a lot of DIYs actually start. I came across this pin right HERE.

I tried to copy those but truth to be told, the result was a huge fail. But I wasn't willing to give up the whole idea so I did some sort of an interpretation using wooden balls from IKEA instead of fir cones. Et voilà, it worked!

Let me give you a quick run-down...

Materials needed:
  • VINTER 2016 decoration balls from IKEA (currently available HERE)
  • Thin felt in grey, light blue, white and yellow
  • Fabric glue & hot glue
  • Brown chenille
  • Eyes
  • scissors and a pen


And you might also need those three shapes. The biggest one should have an overall height of 6cm.


How-To:
  1. For each owl, cut out two large wings, two small wings and one shape for the head plus a tiny yellow triangle for the beak.
  2. Afterwards, glue one small wing on a large wing making two two-layered wings per owl using fabric glue. Mix and match the colors of the felt you are using.
  3. Glue a little yellow beak plus two eyes on the shape for the head using fabric glue.
  4. Using plies and a wire cutter, put together two feet per owl using the brown chenille.
  5. Glue two wings, one head shape and two feet onto one decoration ball using hot glue.
What will you hang on your Christmas tree this year? Self-made ornaments or store bought ones?

Happy crafting, everyone!

Yours
Uta

October 19, 2016

Inside my Journal: Flowers and other Plants

Hello everyone,

today I would like to share yet again something I put into my journal.

This year I set up my very first balcony garden. It contained about seven different plants which I thought would definitely be enough for a start. Of course I had to document my little undertaking in my journal.


And then there's this wonderful quote I found in one edition of my beloved Flow magazine. Of course I had to add it too!


"There are Flowers everywhere for those who want to see them" (Henry Matisse)

Have a wonderful morning/afternoon/evening/night, everyone!

Yours
Uta

PS: Have a look right HERE to see how I documented my little tea addiction in my journal as well :)

October 12, 2016

A new Planner in the Making

Hello everyone,

A couple of days ago I started to set up my planner for 2017. I decided to go with a self-made one for a couple of reasons this time so I bought a black dotted A5 Leuchtturm 1917 as a basis. It has 249 pages plus an index - quite a lot of space to squeeze lots of things in it.

Knowing I had 249 pages to use I did some brainstorming:
Which sections do I need and how much space should each occupy? 

At the beginning of the planner, I decided I would put the following pages:
- Overview of 2017 [1 page]
- Months of 2017 in columns [4 pages]
- Overview of 2018 [1 page]
- Goals for 2017 maybe... [1 page]
- Birthdays [2 pages]

The following part would be repeated at the beginning of each month:
- Overview of the month and a section for notes [2 pages]

And these pages would be added for each week:
- Overview of the week [2 pages]
- Notes [1 page]
- Expenses [1 page]

And at the end of the planner:
- Gift ideas [2 pages]
- Wish list [1 page]
- Important addresses [1 page]


As you can see I then started to put some post its into the Leuchtturm notebook to mark the first sections.
Of course I had to start the actual setup right away. So far I completed the overviews for 2017 and 2018. As you can see, I decided to go pretty clean and minimalist.


Have you decided on a planner for 2017 yet?

Yours
Uta

PS: Have a look right HERE to see how I set up my 2016 planner!

October 5, 2016

Planner & Bullet Journal Update

Hello everyone,

I just recently tried out new layouts in both my planner and my bullet journal and I thought it would be worth sharing. So here we go!

During the last couple of weeks I realized that having some kind of weekly overview in my planner would be great. Inspired by YouTube lady Ella The Bee I first tried this:


It's basically the result of squeezing Saturday and Sunday on one page and then recycling the Sunday page for a weekly overview of the following week.

Truth to be told, I tried this a couple of time throughout the month of September but didn't really feel comfortable with it. It reduced the space available for Saturday and Sunday plus I took me quite some time to draw out the spread.

During my second attempt to integrate a weekly overview, I simply used a Moleskine template which I printed on plain white paper, cut out and taped inside my planner.

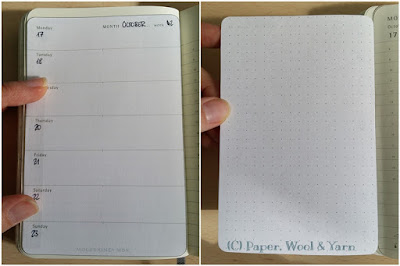
Taped to the left page, dot grid on the back for taking notes

Integrated as a new page, dot grid on the back for taking notes

Depending on the page on which each week started, I either taped the weekly overview to the left page or integrated it as some kind of additional page. So far I like it. I'll do a test run throughout October and then decide how to proceed with November and December.

My Bullet Journal that I use for work also got a little make-over. I also experimented with some different kinds of weekly overview layouts. So far this one seems to be the winner:


It integrates both the actual week as well as the following one, has a quick overview of the month (top right) as well as some space for miscellaneous notes (bottom right).

Alright, that's it for today.
How is your bullet journaling and planning coming along? Did you also make some layout changes recently?

Yours
Uta

PS: To read more about my planner as well as my bullet journal look right HERE ...