Showing posts with label Recycling. Show all posts

August 25, 2013

From Shopping Tote to Shoe Bag

I just recently recycled on of my many many shopping totes by turning it into a shoe bag!
A not so easy task for me, as I don't sew that often but I made it. And I think the result is a good one even though it's not perfect!

Before...


...and after:


Yesterday night was awesome by the way! The orchestra played from 8 pm until about 11 pm with a 30 min break in between. While they played the last song at 11 pm fireworks started. Definitely a wonderful experience! Unfortunately I forgot to bring my camera and therefore had to use my cell to take some (bad quality) pictures:


The building behind the stage is the Orangerie, one of the most famous historical places here in Kassel.

I wish all of you a sunny Sunday! Mine is quite cloudy actually, I think the weather forcast said it is going to rain in the afternoon, let's see...


Yours
Uta

PS: Turns out, this can be counted as yet another project for my No-Buy Challenge :)

August 9, 2013

Owl Post

Of course my owl twins had to travel in style. Unfortunately I ran out of appropriately sized envelopes lately. I therefore simply crafted one:


Have a nice weekend, everyone!

Yours
Uta

PS: No-Buy Challenge project #12 - mission accomplished :)

May 17, 2013

Gift Wrapping

Hello everyone,

I just quickly wanted to share with you how I wrapped this year's Mother's Day present for my mum:


Warm greetings from rainy Kassel,
Uta

April 11, 2013

Project #9: Tea Bag Shaped Gift Tags

I came across this pin over at pinterest a couple of weeks ago, tea bag shaped gift tags. And I finally found some time to make some myself:


I used:
  • Brown wrapping paper scraps
  • Yarn
  • Stamps & pad
  • Staples

Yours
Uta

April 4, 2013

How To Print On Paper Scraps

For my last No Buy Challange project I had to print something on paper scraps and I wanted you to know how easy that is...

Step 1: Take a sheet of scratch paper, put it into your printer and print out what you want to print on the paper scraps.


Step 2: Take the paper scraps and tape them right above the different shapes.


Step 3: Put the sheet of paper on which you just taped the paper scraps back into the printer.


Step 4: Now all you have to do is to remove the paper scraps from the sheet of scratch paper, cut them into the desired shapes and you're done!


Easy, right :)

Happy Crafting!

Yours
Uta

April 1, 2013

Project #8: Gift Tags

After a very long time finally another No-Buy-Challange project: Gift Tags!


I used:
  • Red cardboard
  • Brown wrapping paper (I used scraps)
  • Strong thread in red and white
  • Glue
The following has been printed on the different tags:
  • Von mir für dich (Engl. From me for you)
  • Happy Birthday
  • Einfach mal so (Engl. Just because)
  • Ich denk an dich (Engl. I'm thinking of you)


I hope you are all enjoying a sunny Easter Weekend!!!

Love,
Uta

February 7, 2013

Project #4: A Felt Tote

I just finished my "No Buy" project number four: A felt tote!

I used parts of that IKEA bag I already cut into pieces for project #2. The rest is blue felt.


I used:
  • A blue IKEA plastic bag
  • Royal blue felt (yes, it's blue even though in the pictures it looks purple)
  • Navy blue sewing thread

The tote measures approximately 25 x 30 cm.

Yours
Uta

February 1, 2013

Project #2: A Pencil Case

Here's my second "No Buy" project: A pencil case made out of an IKEA bag!

Besides using things I already own I also recycled one of the numerous IKEA bags I bought. IKEA Kassel is just 10 minutes away, I think that explains why I have so many ;)


I used:
  • A blue IKEA plastic bag
  • A navy blue plastic zipper, 23 cm
  • Navy blue sewing thread

The pencil case measures 19 x 8 cm.
And yes, I own a lot of LAMY pens :)

Yours,
Uta

January 7, 2013

Tea Bag Paper Flowers

A couple of days ago, a tutorial for cute little paper flowers came my way and as I still have tons of tea bag papers stored in a box....


I'm thinking of maybe crafting a few more and than making a ball out of it but I'm not sure yet.

Uta

August 15, 2012

Tea Bag Folding Revisited

I just wanted to post an update on the little stars I made off tea bag papers a couple of weeks ago.

I glued a couple of them together, added some pearls and a hanger:


- Uta -

July 30, 2012

Taking Notes

It took me just 10 minutes to make this little notebook:


What do you think?

- Uta -

June 13, 2012

Recycling Paper Box

I found the inspiration for this project while browsing Pinterest. Honestly, Pinterest is sooo addictive :)
Of course I used recycled paper (old paper bags).


I'm not sure yet what I am going to store in it. Maybe I'll place it on the chest of drawers in my bedroom and put some cosmetics in it, I'm not sure yet.

- Uta -

April 1, 2012

Tea Bag Folding

Remember the numerous tea bag papers I collected but didn't know what to do with? Well, Debi (visit her blog Dly's Hooks and Yarns) suggested to try out tea bag folding. What a great idea - thank you, Debi! Tea bag folding is so much fun :)
Here are some of my results:

Made from Meßmer tea bag papers

Made from Twinings of London tea bag papers


I'm thinking about using some of those stars for my Christmas cards this year.

Do you want to try out tea bag folding yourself? Have a look right here!

- Uta -

March 8, 2012

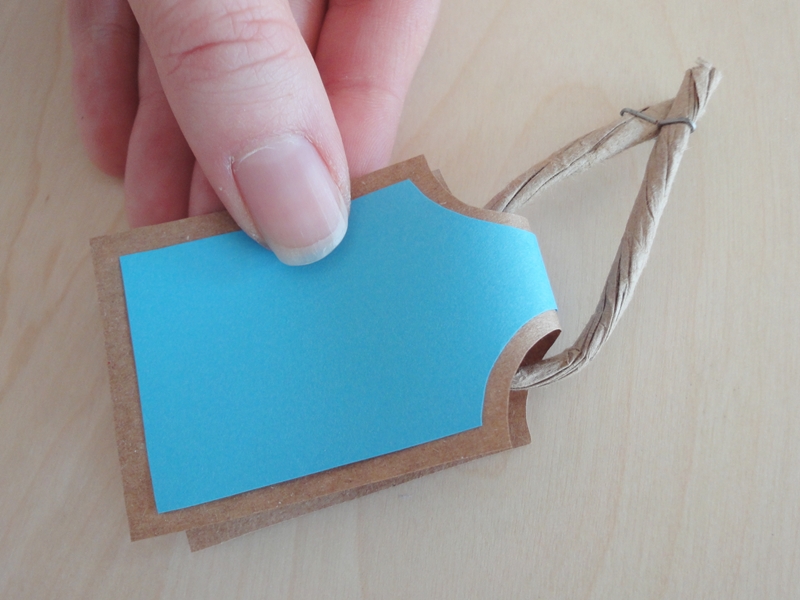
Self-Made Gift Tags: A Tutorial


A couple of days ago I blogged about some self-made gift tags, now I want to show you how to make them.

Step 1: Materials
Based on how I made these gift tags you're going to need the following materials*:
- Paper bag handles made of twisted paper
- Brown Paper bag
- Coloured paper

Step 2: Stencils
You will need two hourglass shaped stencils**. They look pretty much the same but they have a different size. Of course, you don't have to stick to the shape I used. Be fancy, be creative and choose something different! Or feel free to simply use my shapes:


Step 3: Draw and Cut
Arrange the bigger stencil on the outside of the brown paper bag and transfer it's shape onto it with a pencil.
Do the same with the small stencil and the coloured paper.


Afterwards, cut out the shapes and raze out all traces of pencil that are left on them.

Step 4: Cut and Staple
Cut the paper bag handles in two. Put both ends of every piece together and secure with a staple.


Now fold the shapes made of the brown paper bag as well as those made of the coloured paper like shown in the picture below:


Secure the shapes with two staples per gift tag:


And you're done :)


- Uta -

-------------

* It's important to be kind to mother earth - recycling paper bags instead of throwing them away means being kind.
** Whenever you make stencils I highly recommend using scratch paper or a piece of newspaper, it's more eco-friendly.

February 25, 2012

Self-Made Gift Tags

These gift tags were on my to-do list for ages. This weekend, I finally managed to make them :)


They are basically just made of paper and some staples.

February 20, 2012

Self-Made Envelopes - A Tutorial

Remember the self-made envolopes I blogged about here? Well, someone suggested I put up a tutorial on how to make them so here we go :)

Step 1: The Stencils
The first thing you need and probably therefore the first thing you have to work on are your stencils. I made mine using ruler, triangle and some scratch paper*. The easier way would be to simple use another envelople.
I'm talking about stancils (plural) because the envelopes I made required two - one for the envelope itself and another one for the inlay:


If you like, you can also make a stencil for an address field. Mine is a simple rectangle - 7cm x 4 cm - with round edges. I myself don't use a stencil for that as it can be easily drawn with a triangle.

Step 2: The Material
Next, you have to choose the material you want your envelopes to be made of. There are various options. You can for example print out patterns or use old newspapers, wrapping material or paper bags** like I did. Here are my ideas:


When you decided to print out something you're pretty much done at this point with step 2 of this tutorial.
When you went for other material, like the paper bags or the newspapers you now have to prepare it. Preperation in this context means cutting things in shape an maybe also ironing them:


Step 3: Draw and Cut
Now we're at the point where I normally get the feeling that I need more hands than I actually have.
Arrange the stencil on the inside of the material you chose and prepared in step 2 and transfer the different shapes onto it with a pencil. Afterwards, cut them out.


You should then also raze out all traces of pencil that are left on your future envelope, inlay and address field.

Step 4: Fold and Glue
After everything is cut out, you can begin to fold the envelope. Therefor, slightly perforate the paper with the help of a needle and a ruler. Afterwards, the folding will be much easier and the folded edges will look nicer.


Then glue the inlay into the envelope.


After that glue the envelope together. Therefore put some glue on those two edges.


At the end, add the address field.


Now to secure everything I recommend putting your envelope under a heavy book for a little while.

Done :)


- Uta -

-----------------

* Whenever you make stencils I highly recommend using scratch paper or a piece of newspaper, it's more eco-friendly.
** Not only will mother earth be thankful when you reuse 'old stuff', it will also make your envelopes truly unique.

February 14, 2012

Self-made Envelopes

I'm a sucker for stationary always looking for nice letter paper and evelopes. Unfortunately, it's hard to find stationary I really like. Therefore I started to create my own. I began by looking up different patterns and picutres on the internet that I later printed out. Those turned out like this for example:


But as I became more and more aware of the necessity to live a bit more eco-friendly I had a look at things I had lyning around my appartment, things I could maybe reuse or recycle. And I instantly had to think of all the paper bags you get for example at Starbucks or at TeeGschwendner. I love to buy things at those shops so I have a couple of them.

Well, I then started to craft my first Starbucks envelopes:


And those are the ones made out of TeeGschwendner bags and After Eight paper:


- Uta -